在 Facebook(Meta)账户上启用双重验证(2FA) 以提升安全性。主要内容包括:

  1. 双重验证的作用:防止未经授权的登录,即使密码泄露也能保护账户。

  2. 设置步骤:通过手机短信、验证器应用(如 Google Authenticator)或物理安全密钥绑定 2FA。

  3. 备用方法:生成一次性备用代码,避免设备丢失时无法登录。

  4. 注意事项:建议绑定多设备并妥善保存备用代码,以防锁定账户。

Read more »

Shopify 结账页面的国际运费设置问题,主要针对非美国地址无法正确计算运费的情况。

问题描述:用户填写非美国地址后,运费无法正常显示或设置失败。

解决方案:

  1. 在 Shopify 后台 设置 > 配送 中添加目标国家/地区,并绑定运费规则。

  2. 检查是否启用自动运费计算(如 Shopify Shipping 或第三方物流集成)。

Read more »

1、解释为什么如下代码会打印 6 个 6

1
2
3
4
5
6
let i = 0
for(i = 0; i<6; i++){
setTimeout(()=>{
console.log(i)
},0)
}

SetTimeout在for循环之后才执行,那时候i为6,然后再打印出6次6

2、写出让上面代码打印 0、1、2、3、4、5 的方法

1
2
3
4
5
for(let i = 0; i<6; i++){
setTimeout(()=>{
console.log(i)
},0)
}

3 、(可选内容)除了使用 for let 配合,还有什么其他方法可以打印出 0、1、2、3、4、5,如果你能找到并写在博客里,可以得到五星好评 :)

方法一:

1
2
3
4
5
6
7
8
let i = 0
while(1){
console.log(i)
i++
if(i>5){
break;
}
}

方法二:

1
2
3
4
5
6
7
8
9
let i = 0
let timer = setInterval(()=>{
if(i<6){
console.log(i);
i++;
}else{
this.timer = null;
}
}, 0);

方法三:

1
2
3
4
let i = new Array(6).fill('')
i.map((k,j)=>{
console.log(j);
})

方法四:

1
2
3
4
5
6
7
8
9
let i = 0
switch (i){
case 0:console.log(i);i++;
case 1:console.log(i);i++;
case 2:console.log(i);i++;
case 3:console.log(i);i++;
case 4:console.log(i);i++;
case 5:console.log(i);break;
}

1、jQuery 如何获取元素

1.1 选择表达式可以是CSS选择器:

1
2
3
4
5
6
7
 $(document) //选择整个文档对象

 $('#myId') //选择ID为myId的网页元素

 $('div.myClass') // 选择class为myClass的div元素

 $('input[name=first]') // 选择name属性等于first的input元素

1.2 jQuery特有的表达式:

1
2
3
4
5
6
7
8
9
10
11
$('a:first') //选择网页中第一个a元素

$('tr:odd') //选择表格的奇数行

$('#myForm :input') // 选择表单中的input元素

$('div:visible') //选择可见的div元素

$('div:gt(2)') // 选择所有的div元素,除了前三个

$('div:animated') // 选择当前处于动画状态的div元素

2、jQuery 的链式操作是怎样的

1
$('div').find('h3').eq(2).html('Hello');

分解开来,就是下面这样:

1
2
3
4
5
6
7
 $('div') //找到div元素

   .find('h3') //选择其中的h3元素

   .eq(2) //选择第3个h3元素

   .html('Hello'); //将它的内容改为Hello

jQuery还提供了.end()方法,使得结果集可以后退一步:

1
2
3
4
5
6
7
8
9
10
11
12
13
  $('div')

   .find('h3')

   .eq(2)

   .html('Hello')

   .end() //退回到选中所有的h3元素的那一步

   .eq(0) //选中第一个h3元素

   .html('World'); //将它的内容改为World

3、jQuery 如何创建元素

1
2
3
4
5
$('<p>Hello</p>');

$('<li class="new">new list item</li>');

$('ul').append('<li>list item</li>');

4、jQuery 如何移动元素

假定我们选中了一个div元素,需要把它移动到p元素后面。
第一种方法是使用.insertAfter(),把div元素移动p元素后面:

1
$('div').insertAfter($('p'));

第二种方法是使用.after(),把p元素加到div元素前面:

1
 $('p').after($('div'));

5、jQuery 取值和赋值

1
2
3
$('h1').html(); //html()没有参数,表示取出h1的值

$('h1').html('Hello'); //html()有参数Hello,表示对h1进行赋值

常见的取值和赋值函数如下:

1
2
3
4
5
6
7
8
9
10
11
 .html() 取出或设置html内容

 .text() 取出或设置text内容

 .attr() 取出或设置某个属性的值

 .width() 取出或设置某个元素的宽度

 .height() 取出或设置某个元素的高度

 .val() 取出某个表单元素的值

1、事件捕获

捕获型事件(event capturing):事件从最不精确的对象(document 对象)开始触发,然后到最精确(也可以在窗口级别捕获事件,不过必须由开发人员特别指定)

2、事件冒泡

冒泡型事件:事件按照从最特定的事件目标到最不特定的事件目标(document对象)的顺序触发。

3、捕获和冒泡顺序

w3c规定了,任何发生在w3c事件模型中的事件,首是进入捕获阶段,直到达到目标元素,再进入冒泡阶段。绑定在被点击元素的事件是按照代码的顺序发生的。
冒泡,它就像鱼儿吐泡泡一样,从下到上。
从祖先元素开始慢慢找,最后找到我们的点击目标,这个行为不就像警察叔叔抓坏人一样,逐渐的缩小抓捕范围,最后确定到某一个人身上,所以这个叫做捕获。


事件委托还有一个名字叫事件代理,JS高程上讲:事件委托就是利用事件冒泡,只制定一个时间处理程序,就可以管理某一类型的所有事件。我用取快递来解释这个现象: 有三个同事预计会在周一收到快递。为签收快递,有两种办法:一是三个人在公司门口等快递;二是委托给前台代为签收。现实当中,我们大都采用委托的方案。前台收到快递后,她会判断收件人是谁,然后按照收件人的要求签收,甚至代为付款。这种方案还有一个优势,那就是即使公司里来了新员工(不管多少),前台也会在收到寄给新员工的快递后核实并代为签收。


1、MVC 三个对象分别做什么,给出伪代码示例

M:model(模型) 负责操作数据与服务器的交互,将请求到的数据传给control
V:View (视图) 负责所有UI界面,比如el,templete,render
C:controller(控制器)负责其他,比如初始化和事件,负责监听和处理View事件,并更新和调用 Model,负责监听Model数据变化,并更新View

1
2
3
4
5
6
7
8
9
10
11
12
13
14
15
16
17
18
19
20
21
22
23
24
25
26
27
28
29
30
31
32
33
34
35
36
37
38
39
40
41
42
43
44
/** 模擬 Model, View, Controller */
var M = {}, V = {}, C = {};

/** Model 負責存放資料 */
M.data = "hello world";

/** View 負責將資料輸出到螢幕上 */
V.render = (M) => { alert(M.data); }

/** Controller 作為一個 M 和 V 的橋樑 */
C.handleOnload = () => { V.render(M); }

/** 在網頁讀取的時候呼叫 Controller */
window.onload = C.handleOnload;

const m={
data={},
create(){},
delete(){},
update(){},
get(){}
}

const v={
el:null,
html:`代码`,
init(container){
v.el=$(container)
},
render(n){}
}

const c={
init(constainer){}
events:{事件}
add(){执行}
minus(){执行}
update(){执行}
get(){执行}
autoBindEvents(){逻辑}
}
————————————————
版权声明:本文为CSDN博主「小峰同学的前端之路」的原创文章,遵循CC 4.0 BY-SA版权协议,转载请附上原文出处链接及本声明。
原文链接:https://blog.csdn.net/abc465200/article/details/106731890

2、EventBus 有哪些 API,是做什么用的,给出伪代码示例

1
2
3
4
5
6
7
8
9
10
11
12
13
14
15
16
17
18
19
20
21
22
23
24
25
26
27
28
29
30
31
32
33
_self.getEventBus
方法:getEventBus:function(){}
描述:直接返回前端EventBus对象,不推荐直接使用。

_self.subscribeEvent
方法:subscribeEvent:function(event,fn,pointcut){}
描述:注册事件,并指定实现方法和插入点
参数:event:字符串形式事件名,命名规则为EventActionEvent结尾
fn:实现方法
插入点类型:after、overwrite、before

_self.unSubscribeEvent
方法:unSubscribeEvent:function(event){}
描述:取消注册事件
参数:event:字符串形式事件名,命名规则为EventActionEvent结尾

_self.fireEvent
方法:fireEvent:function(event){}
描述:触发某个具体事件,执行这个事件对于的实现方法队列
参数:event:字符串形式事件名,命名规则为EventActionEvent结尾
其他参数:可以增加一些后续参数

Handler实现说明:
参数:接收fireEvent方法传递过来的参数
特殊参数e:只有按钮绑定的页面功能才有值,手工调用不会有e的。页面功能代码生成时,默认会生成这个e,值为jquery.event
返回值:无返回值的处理,只能通过返回值确定是否继续执行后续的方法队列
true/无:继续执行后续的实现方法队列
false:停止执行后续的实现方法队列
其他:返回true
Handle队列中数据的传递:只能利用页面的全局变量,本身没有提供处理机制
————————————————
版权声明:本文为CSDN博主「小峰同学的前端之路」的原创文章,遵循CC 4.0 BY-SA版权协议,转载请附上原文出处链接及本声明。
原文链接:https://blog.csdn.net/abc465200/article/details/106731890

3、表驱动编程是做什么的(可以自己查查资料)

Table-Driven Approach
解决if else面对多种情况的情形,以表的形式进行获取数据,通过下标索引来查

1
2
3
4
5
6
methods{
add(){执行}
delete(){执行}
minus(){执行}
...
}

4、我是如何理解模块化的

模块化就是把一个模块的代码放在一个文件夹里,再进行引入,简化了代码之间的影响

1
2
3
4
let string=`内容`
import default string//导出

import $ from `string`//引入

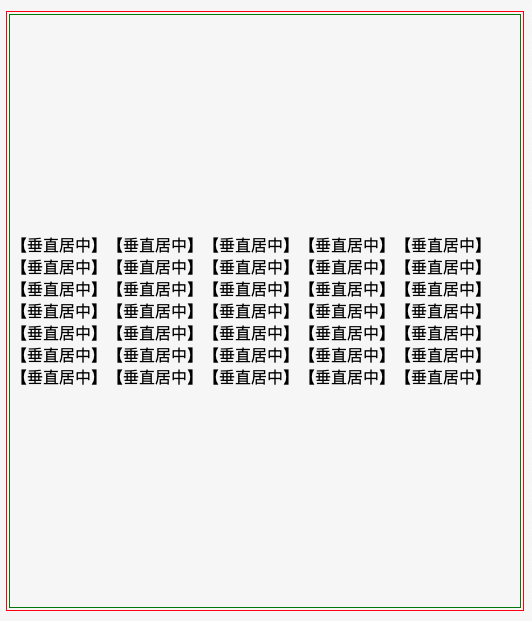
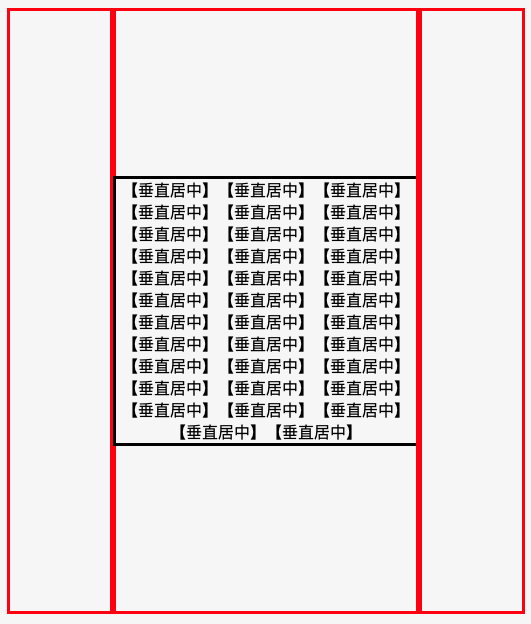
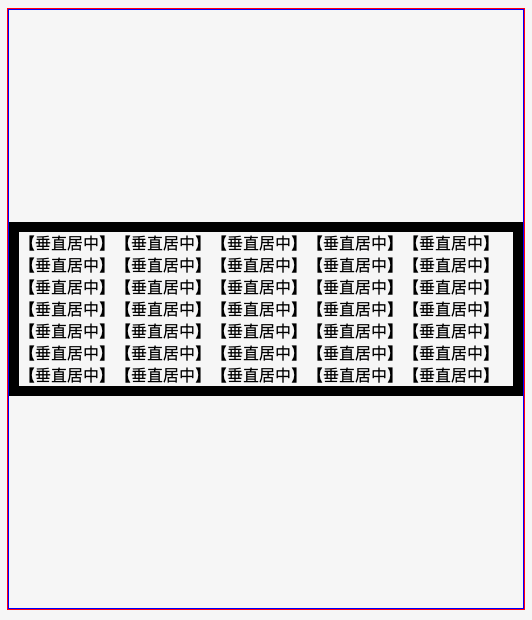
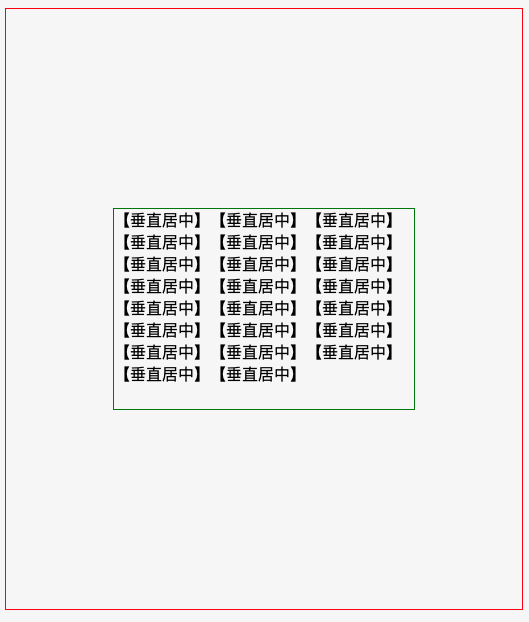
如果 .parent 的 height 不写,你只需要 padding: 10px 0; 就能将 .child 垂直居中;

如果 .parent 的 height 写死了,就很难把 .child 居中,以下是垂直居中的方法。

忠告:能不写 height 就千万别写 height。

​​​​​​​1、table自带功能

代码

1
2
3
4
5
6
7
8
9
10
// html
<body>
<table class="parent">
<tr>
<td class="child">
【垂直居中】【垂直居中】【垂直居中】【垂直居中】【垂直居中】【垂直居中】【垂直居中】【垂直居中】【垂直居中】【垂直居中】【垂直居中】【垂直居中】【垂直居中】【垂直居中】【垂直居中】【垂直居中】【垂直居中】【垂直居中】【垂直居中】【垂直居中】【垂直居中】【垂直居中】【垂直居中】【垂直居中】【垂直居中】【垂直居中】【垂直居中】【垂直居中】【垂直居中】【垂直居中】【垂直居中】【垂直居中】【垂直居中】【垂直居中】【垂直居中】
</td>
</tr>
</table>
</body>
1
2
3
4
5
6
7
8
.parent{
border: 1px solid red;
height: 600px;
}

.child{
border: 1px solid green;
}

效果图

​​​​​​​01table自带功能

2、100% 高度的 after before 加上 inline block

代码

1
2
3
4
5
6
7
8
// html
<body>
<div class="parent">
<span class=before></span><div class="child">
【垂直居中】【垂直居中】【垂直居中】【垂直居中】【垂直居中】【垂直居中】【垂直居中】【垂直居中】【垂直居中】【垂直居中】【垂直居中】【垂直居中】【垂直居中】【垂直居中】【垂直居中】【垂直居中】【垂直居中】【垂直居中】【垂直居中】【垂直居中】【垂直居中】【垂直居中】【垂直居中】【垂直居中】【垂直居中】【垂直居中】【垂直居中】【垂直居中】【垂直居中】【垂直居中】【垂直居中】【垂直居中】【垂直居中】【垂直居中】【垂直居中】
</div><span class=after></span>
</div>
</body>
1
2
3
4
5
6
7
8
9
10
11
12
13
14
15
16
17
18
19
20
21
22
23
24
25
.parent{
border: 3px solid red;
height: 600px;
text-align: center;
}

.child{
border: 3px solid black;
display: inline-block;
width: 300px;
vertical-align: middle;
}

.parent .before{
outline: 3px solid red;
display: inline-block;
height: 100%;
vertical-align: middle;
}
.parent .after{
outline: 3px solid red;
display: inline-block;
height: 100%;
vertical-align: middle;
}

效果图

​02加上inlineBlock

优化版

1
2
3
4
5
6
7
8
// html
<body>
<div class="parent">
<div class="child">
【垂直居中】【垂直居中】【垂直居中】【垂直居中】【垂直居中】【垂直居中】【垂直居中】【垂直居中】【垂直居中】【垂直居中】【垂直居中】【垂直居中】【垂直居中】【垂直居中】【垂直居中】【垂直居中】【垂直居中】【垂直居中】【垂直居中】【垂直居中】【垂直居中】【垂直居中】【垂直居中】【垂直居中】【垂直居中】【垂直居中】【垂直居中】【垂直居中】【垂直居中】【垂直居中】【垂直居中】【垂直居中】【垂直居中】【垂直居中】【垂直居中】
</div>
</div>
</body>
1
2
3
4
5
6
7
8
9
10
11
12
13
14
15
16
17
18
19
20
21
22
23
24
25
26
27
.parent{
border: 3px solid red;
height: 600px;
text-align: center;
}

.child{
border: 3px solid black;
display: inline-block;
width: 300px;
vertical-align: middle;
}

.parent:before{
content:'';
outline: 3px solid red;
display: inline-block;
height: 100%;
vertical-align: middle;
}
.parent:after{
content:'';
outline: 3px solid red;
display: inline-block;
height: 100%;
vertical-align: middle;
}

3、div 装成 table

代码

1
2
3
4
5
6
7
8
9
10
// html
<body>
<div class="table">
<div class="td">
<div class="child">
【垂直居中】【垂直居中】【垂直居中】【垂直居中】【垂直居中】【垂直居中】【垂直居中】【垂直居中】【垂直居中】【垂直居中】【垂直居中】【垂直居中】【垂直居中】【垂直居中】【垂直居中】【垂直居中】【垂直居中】【垂直居中】【垂直居中】【垂直居中】【垂直居中】【垂直居中】【垂直居中】【垂直居中】【垂直居中】【垂直居中】【垂直居中】【垂直居中】【垂直居中】【垂直居中】【垂直居中】【垂直居中】【垂直居中】【垂直居中】【垂直居中】
</div>
</div>
</div>
</body>
1
2
3
4
5
6
7
8
9
10
11
12
13
14
// css
div.table{
display: table;
border: 1px solid red;
height: 600px;
}
div.td{
display: table-cell;
border: 1px solid blue;
vertical-align: middle;
}
.child{
border: 10px solid black;
}

效果图

03div 装成 table

4、margin-top -50%

代码

1
2
3
4
5
6
7
8
// html
<body>
<div class="parent">
<div class="child">
【垂直居中】【垂直居中】【垂直居中】【垂直居中】【垂直居中】【垂直居中】【垂直居中】【垂直居中】【垂直居中】【垂直居中】【垂直居中】
</div>
</div>
</body>
1
2
3
4
5
6
7
8
9
10
11
12
13
14
15
16
// css
.parent{
height: 600px;
border: 1px solid red;
position: relative;
}
.child{
border: 1px solid green;
width: 300px;
position: absolute;
top: 50%;
left: 50%;
margin-left: -150px;
height: 100px;
margin-top: -50px;
}

效果图

​​​​​​​04margin-top -50%.png

5、translate -50%

代码

1
2
3
4
5
6
7
8
// html
<body>
<div class="parent">
<div class="child">
【垂直居中】【垂直居中】【垂直居中】【垂直居中】【垂直居中】【垂直居中】【垂直居中】【垂直居中】【垂直居中】【垂直居中】【垂直居中】【垂直居中】【垂直居中】【垂直居中】【垂直居中】【垂直居中】【垂直居中】【垂直居中】【垂直居中】【垂直居中】【垂直居中】【垂直居中】【垂直居中】【垂直居中】【垂直居中】【垂直居中】【垂直居中】【垂直居中】【垂直居中】【垂直居中】【垂直居中】【垂直居中】【垂直居中】【垂直居中】【垂直居中】
</div>
</div>
</body>
1
2
3
4
5
6
7
8
9
10
11
12
13
// css
.parent{
height: 600px;
border: 1px solid red;
position: relative;
}
.child{
border: 1px solid green;
position: absolute;
top: 50%;
left: 50%;
transform: translate(-50%,-50%);
}

效果图

05translate -50%.png

6、absolute margin auto

代码

1
2
3
4
5
6
7
8
// html
<body>
<div class="parent">
<div class="child">
【垂直居中】【垂直居中】【垂直居中】【垂直居中】【垂直居中】【垂直居中】【垂直居中】【垂直居中】【垂直居中】【垂直居中】【垂直居中】【垂直居中】【垂直居中】【垂直居中】【垂直居中】【垂直居中】【垂直居中】【垂直居中】【垂直居中】【垂直居中】【垂直居中】【垂直居中】【垂直居中】
</div>
</div>
</body>
1
2
3
4
5
6
7
8
9
10
11
12
13
14
15
16
17
// css
.parent{
height: 600px;
border: 1px solid red;
position: relative;
}
.child{
border: 1px solid green;
position: absolute;
width: 300px;
height: 200px;
margin: auto;
top: 0;
bottom: 0;
left: 0;
right: 0;
}

效果图

​​​​​​​06absolute margin auto

7、flex

代码

1
2
3
4
5
6
7
8
9
<!DOCTYPE html>
// html
<body>
<div class="parent">
<div class="child">
【垂直居中】【垂直居中】【垂直居中】【垂直居中】【垂直居中】【垂直居中】【垂直居中】【垂直居中】【垂直居中】【垂直居中】【垂直居中】
</div>
</div>
</body>
1
2
3
4
5
6
7
8
9
10
11
12
13
// css
.parent{
height: 600px;
border: 3px solid red;

display: flex;
justify-content: center;
align-items: center;
}
.child{
border: 3px solid green;
width: 300px;
}

效果图

​​​​​​​07flex

​​​​​​​01table自带功能


未清除浮动的影响

  1. 父级元素因为子级浮动引起的内部高度为0
  2. 父级元素的兄弟元素高度为0,其他样式也不能实现

01未清除浮动的影响

代码

1
2
3
4
5
6
7
<body>
<div class="father">
<div class="child1">child1</div>
<div class="child2">child2</div>
</div>
<div class="friend">friend</div>
</body>
1
2
3
4
5
6
7
8
9
10
11
12
13
14
15
16
17
18
19
20
21
22
.child1,.child2,.friend{
width:50px;
height:50px;
}

.child1{
float:left;
border:1px solid blue;
}

.child2{
float:left;
border:1px solid green;
}

.friend{
border:1px solid red;
}

.father{
border:1px solid black;
}

方法1:给父元素加上 .clearfix

代码

1
2
3
4
5
6
7
<body>
<div class="father clearfix">
<div class="child1">child1</div>
<div class="child2">child2</div>
</div>
<div class="friend">friend</div>
</body>
1
2
3
4
5
6
7
8
9
10
11
12
13
14
15
16
17
18
19
20
21
22
23
24
25
26
27
28
29
30
31
.child1,.child2,.friend{
width:50px;
height:50px;
}

.child1{
float:left;
border:1px solid blue;
}

.child2{
float:left;
border:1px solid green;
}

.friend{
border:1px solid red;
}

.father{
border:1px solid black;
}

.clearfix:after{
content: '';
display: block; /*或者 table*/
clear: both;
}
.clearfix{
zoom: 1; /* IE 兼容*/
}

效果图

02给父元素加上.clearfix效果图

方法2:给父元素加上 overflow:hidden

代码

1
2
3
4
5
6
7
<body>
<div class="father">
<div class="child1">child1</div>
<div class="child2">child2</div>
</div>
<div class="friend">friend</div>
</body>
1
2
3
4
5
6
7
8
9
10
11
12
13
14
15
16
17
18
19
20
21
22
23
.child1,.child2,.friend{
width:50px;
height:50px;
}

.child1{
float:left;
border:1px solid blue;
}

.child2{
float:left;
border:1px solid green;
}

.friend{
border:1px solid red;
}

.father{
border:1px solid black;
overflow:hidden
}

效果图

03给父元素加上overflow-hidden


  1. Canvas 主要是用笔刷来绘制 2D 图形的。
  2. SVG 主要是用标签来绘制不规则矢量图的。
  3. 相同点:都是主要用来画 2D 图形的。
  4. 不同点:Canvas 画的是位图,SVG 画的是矢量图。
  5. 不同点:SVG 节点过多时渲染慢,Canvas 性能更好一点,但写起来更复杂。
  6. 不同点:SVG 支持分层和事件,Canvas 不支持,但是可以用库实现。

0%